
最近使用某款app进行网盘的文件同步,该app可以在Android、macos、linux、windows等多个平台运行,属实解决了我的一大难题:在多端进行数据同步。该app有14天的试用期,到期后需要购买license,本着最小化的逆向app的原则,尽量不去改动app的原始逻辑。而恰好,该app的试用期与正式版无异,所以本文从它的trial流程进行分析,增加使用日期。
0x01 前言
最近使用某款app进行网盘的文件同步,该app可以在Android、macos、linux、windows等多个平台运行,属实解决了我的一大难题:在多端进行数据同步。
该app有14天的试用期,到期后需要购买license,本着最小化的逆向app的原则,尽量不去改动app的原始逻辑。而恰好,该app的试用期与正式版无异,所以本文从它的trial流程进行分析,增加使用日期。
0x02 分析trial流程
该app使用kotlin编写,采用fluent框架跨平台。本次只分析macos版本,其他版本类似。总所周知,macos下app的可执行文件位于/Applications/xxx.app/Contents/MacOS目录下,但对于kotlin编写的挂平台应用来说,这只是app的入口点,换句话说就是jvm虚拟机的启动文件。而真正的代码逻辑位于Resources目录下,只需用jadx导入该目录,就可以开始分析代码流程。(PS:macos下分析java代码,jadx-gui体验真的很好。)
待jadx加载、分析完成后,我们可以通过trial,left,remain,expire等关键词寻找切入点,如图2-1所示,找到了一处包含trialRemainning的输出语句,该语句位于LicensingUiState类。
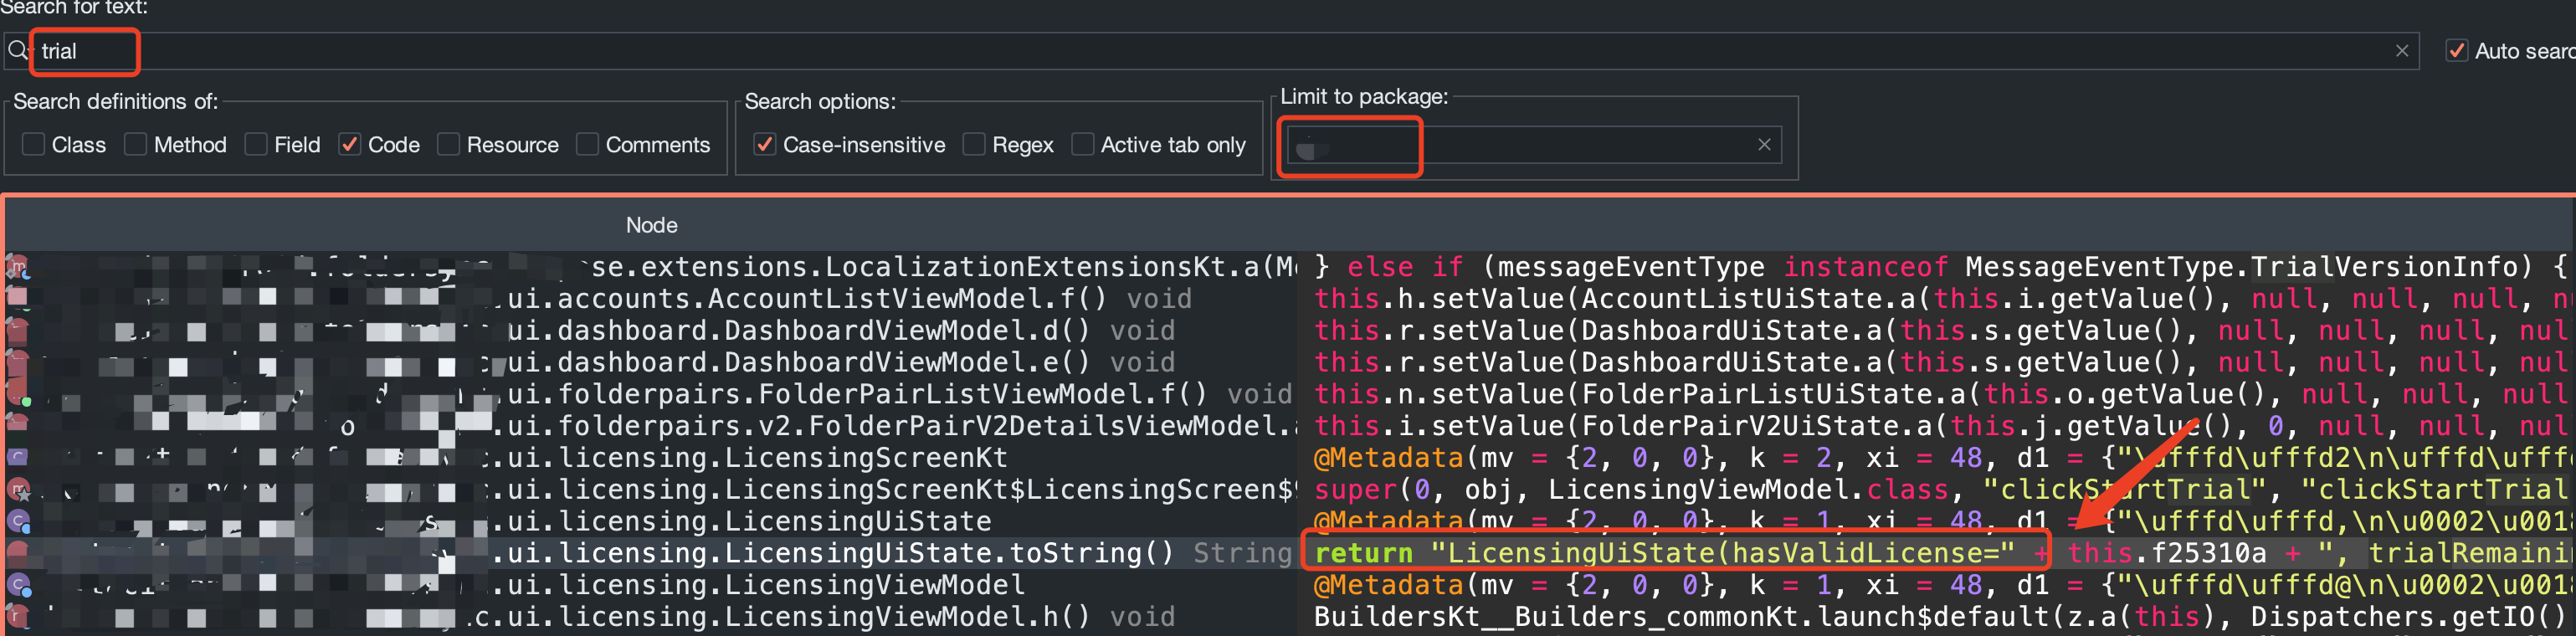
<center>图2-1 trial切入点</center>
    public String toString() {
        return "LicensingUiState(hasValidLicense=" + this.f25310a + ", trialRemainingDays=" + this.f25311b + ", trialPeriodExpired=" + this.f25312c + ", showInWizard=" + this.f25313d + ", uiEvent=" + this.f25314e + ", uiDialog=" + this.f25315f + ")";
    }
一眼可以看出,试用与成员this.f25311b和this.f25312c有关,继续寻找对它们的赋值代码,可以在构造函数所在找到赋值方式,通过对构造函数的调用分析,我们找到多个实例化该类的调用,如图2-2所示。
    public LicensingUiState(boolean z, @Nullable Integer num, boolean z2, boolean z3, @Nullable LicensingUiEvent licensingUiEvent, @Nullable LicensingUiDialog licensingUiDialog) {
        this.f25310a = z;
        this.f25311b = num;
        this.f25312c = z2;
        this.f25313d = z3;
        this.f25314e = licensingUiEvent;
        this.f25315f = licensingUiDialog;
    }
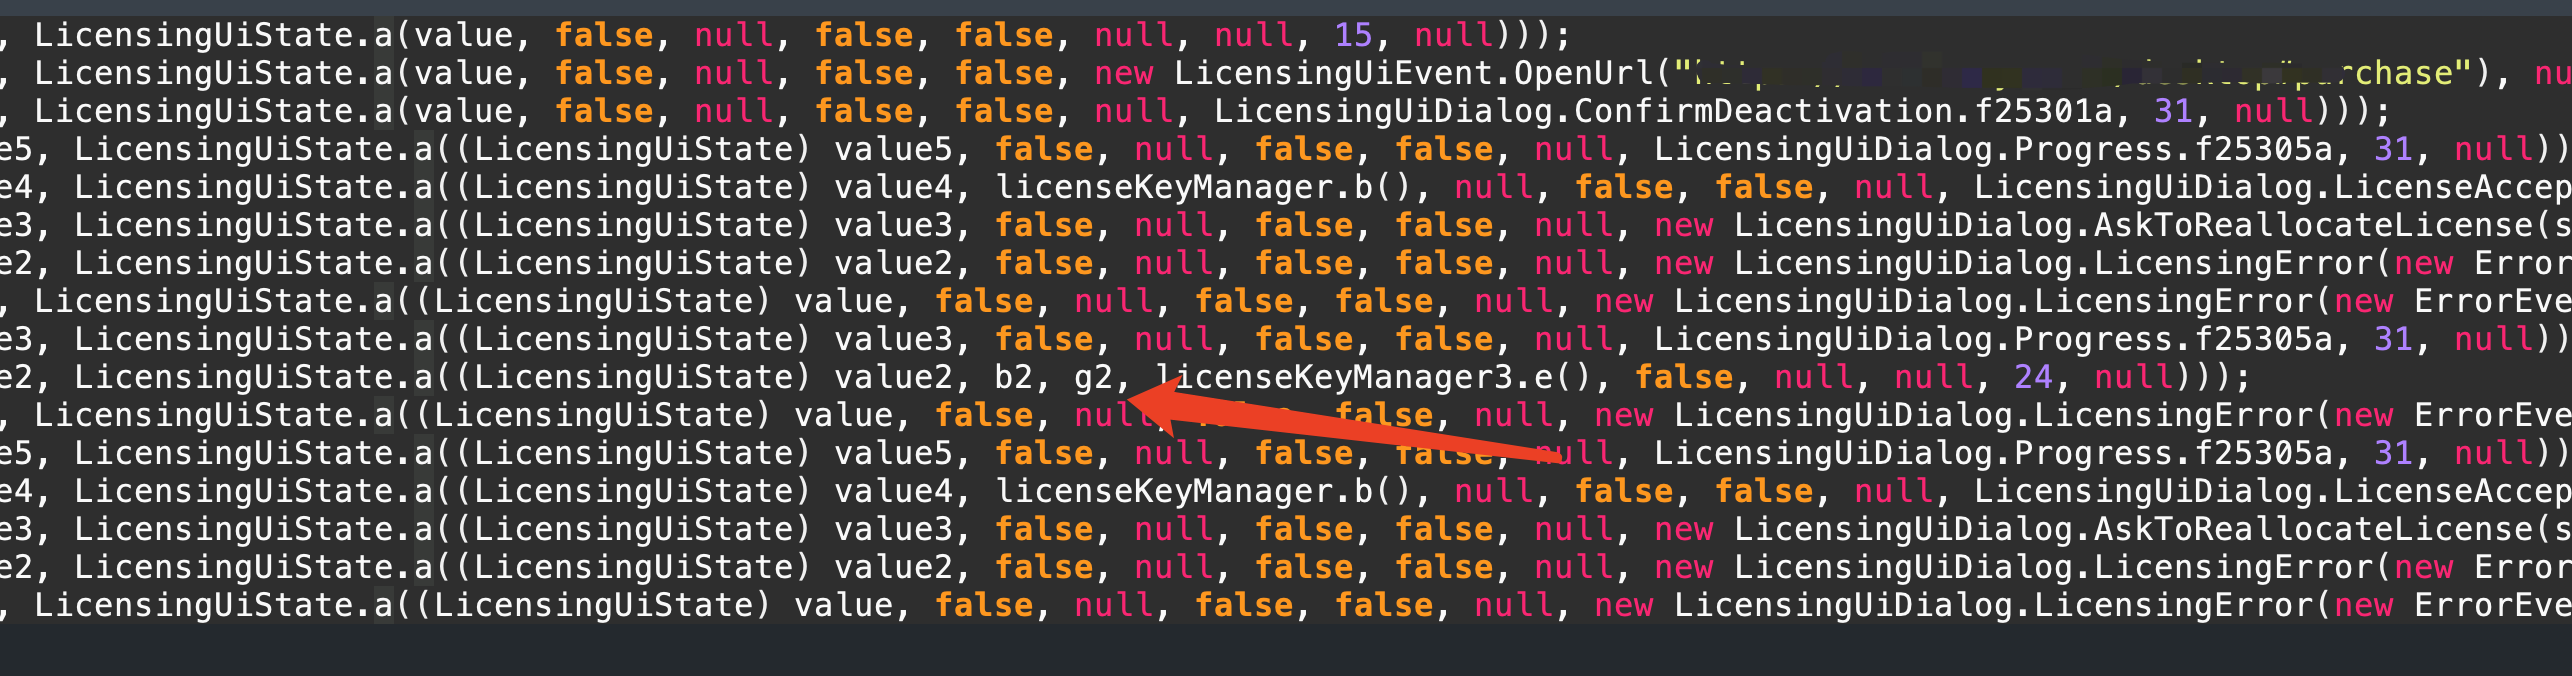
<center>图2-2 LicensingUiState实例化</center>
根据上文分析,我们需要满足第3个参数和第4个参数都被赋值的情况,而图中恰好有一处,两个参数都被赋值。通过以下代码可知trialRemainingDays和trialPeriodExpired都来自于licenseKeyManager,而其又由licensingViewModel.f25316b控制。
     do {
                value2 = mutableStateFlow2.getValue();
                licenseKeyManager = licensingViewModel.f25316b;
                b2 = licenseKeyManager.b();
                licenseKeyManager2 = licensingViewModel.f25316b;
                g2 = licenseKeyManager2.g();
                licenseKeyManager3 = licensingViewModel.f25316b;
            } while (!mutableStateFlow2.compareAndSet(value2, LicensingUiState.a((LicensingUiState) value2, b2, g2, licenseKeyManager3.e(), false, null, null, 24, null)));

// 分割线//
    public LicensingViewModel(@NotNull SavedStateHandle savedStateHandle, @NotNull LicenseKeyManager licenseKeyManager, @NotNull AnalyticsManager analyticsManager) {
        ...
        this.f25316b = licenseKeyManager;
LicenseKeyManager是一个接口类,静态分析时,会直接跳入该接口。这时,我们需要全局搜索哪个类实现了该接口,如图2-3所示,该类由DesktopLicenseManager进行实现。

<center>图2-3 找到LicenseKeyManager实现</center>
找到实现类后,我们通过上文分析的信息找到g()函数和e()函数的实现逻辑。逻辑很简单,从i(),获取注册日期,然后与当前时间进行对比。
i()函数逻辑很直接,首先获取过期字段,然后进入this.f26472e.b(trialExpiry)流程,再转换为long类型进行比较。
private final Long i() {
    String trialExpiry = this.f26470c.getTrialExpiry();
    if (StringsKt.isBlank(trialExpiry)) {
        return null;
    }
    String b2 = this.f26472e.b(trialExpiry);
    if (b2 != null) {
        return StringsKt.toLongOrNull(b2);
    }
    return null;
}
//

public boolean e() {
    Long i = i();
    return i != null && i.longValue() < System.currentTimeMillis();
}
//

public Integer g() {
    Long i = i();
    if (i != null) {
        long longValue = i.longValue() - System.currentTimeMillis();
        if (longValue > 0) {
            return Integer.valueOf((int) new g(longValue).a());
        }
        return null;
    }
    return null;
}
直接跟进getTrialExpiry(),会进入其接口类,所以我们如法炮制,找到其实现。通过读取app_data_te字段,然后转换为字符串进行返回。
public String getTrialExpiry() {
    Setting byName = this.f26500f.getByName("app_data_te");
    if (byName != null) {
        String c2 = byName.c();
        if (c2 != null) {
            return c2;
        }
    }
    return "";
}
同样的方式,我们可以找到this.f26472e.b的实现,其位于KmpEncryptionService类,使用了AES.GCM流式加密算法,接下来的事情就变得简单了,我们只需要寻找key和iv即可伪造另一个时间戳。
public String b(@Nullable String str) {
    ...
    try {
        return str.length() == 0 ? "" : StringsKt.decodeToString(AES.GCM.Key.m8630cipher6q1zMKY$default(this.f27704e, 0, 1, null).decryptBlocking(HexExtensionsKt.hexToByteArray$default(str, null, 1, null)));
    } catch (Exception e2) {
        return null;
    }
}
搜索简单的搜索KmpEncryptionService实例化代码,我们可以找到两处实现该类的代码,如图2-4所示。
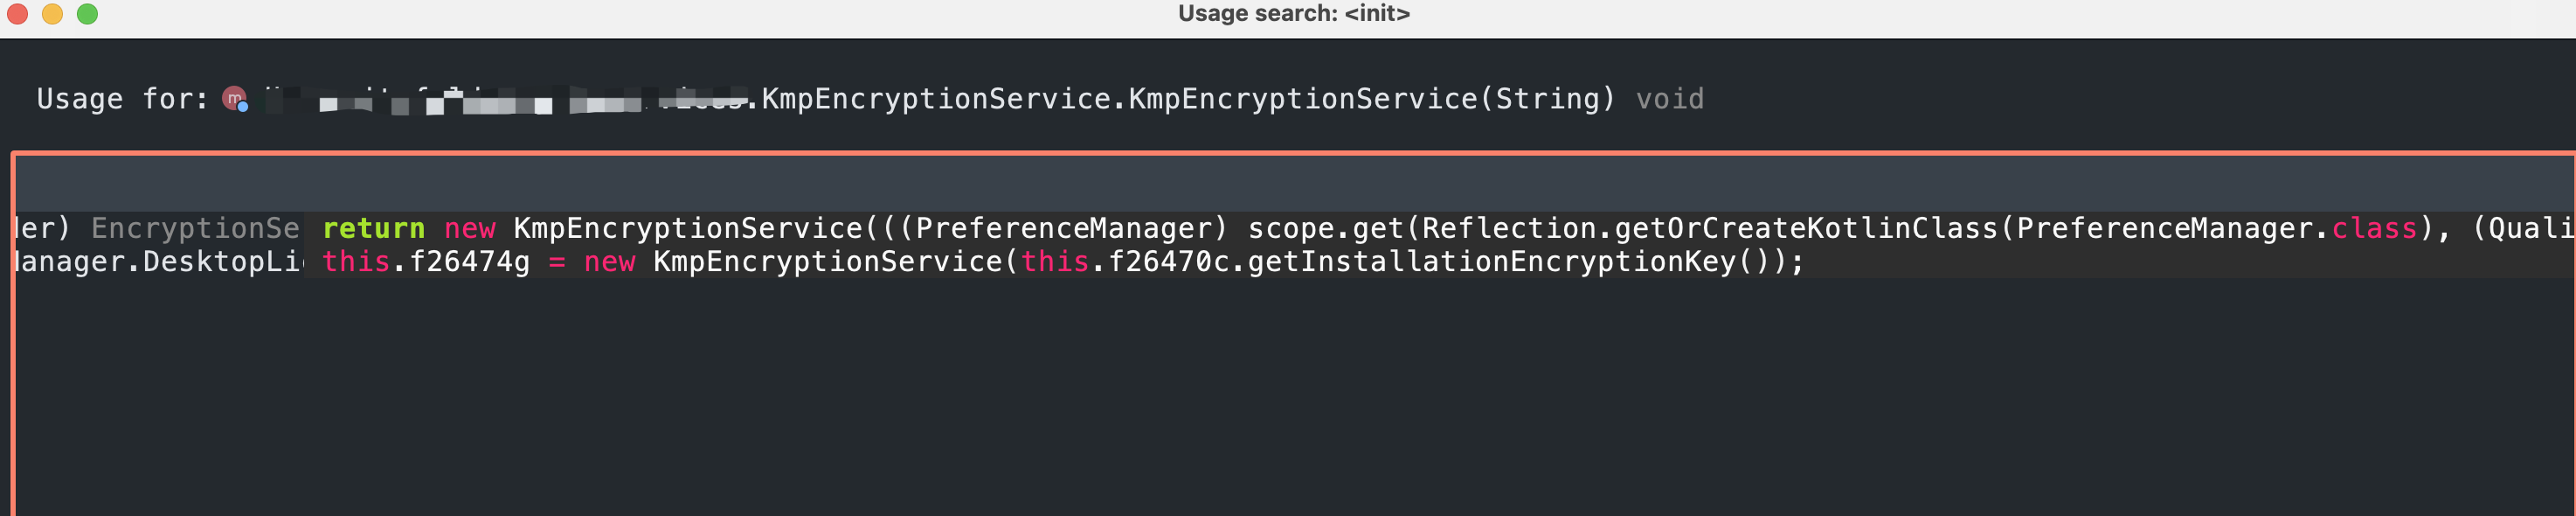
<center>图2-4 寻找KmpEncryptionService实现</center>
通过查看trial date的设置函数,我们可以确定,其使用的getDbEncryptionKey()获取的加密秘钥。
public void setTrialExpiry(@NotNull String str) {
    Intrinsics.checkNotNullParameter(str, "");
    this.f26500f.upsert(new Setting(0, "app_data_te", str, 1, null));
}
    public String getDbEncryptionKey() {
        Setting byName = this.f26500f.getByName("app_data_ek");
        String c2 = byName != null ? byName.c() : null;
        String b2 = c2 != null ? StringXORer.f27965a.b(c2, this.f26501g) : null;
        if (b2 == null) {
            String a2 = KmpEncryptionService.f27701a.a();
            this.f26500f.upsert(new Setting(0, "app_data_ek", StringXORer.f27965a.a(a2, this.f26501g), 1, null));
            return a2;
        }
        return b2;
    }
跟进StringXORer.f27965a.b函数,其逻辑如下所示,其采用base64编码和xor固定字符串。
public final String b(@NotNull String str, @NotNull String str2) {
    byte[] a2 = a(str);
    byte[] bytes = str2.getBytes(Charsets.UTF_8);
    return new String(a(a2, bytes), Charsets.UTF_8);
}

private final byte[] a(byte[] bArr, byte[] bArr2) {
    byte[] bArr3 = new byte[bArr.length];
    int length = bArr.length;
    for (int i = 0; i < length; i++) {
        bArr3[i] = (byte) (bArr[i] ^ bArr2[i % bArr2.length]);
    }
    return bArr3;
}

private final byte[] a(String str) {
    return Base64.decode$default(Base64.Default, str, 0, 0, 6, (Object) null);
}
知道key的解密逻辑后,我们继续寻找key是从哪个文件进行读取。通过getDbEncryptionKey函数名,猜测秘钥是从数据库文件中读取,而本地数据库一般使用sqlite,我们直接寻找sqlite的数据库文件。
继续追踪DesktopPreferenceManager实例化调用代码,其由一个名称为a的函数实例化。
    private static final PreferenceManager a(String str, File file, Scope scope, ParametersHolder parametersHolder) {
        return new DesktopPreferenceManager(str, "2.0.3", file, (SettingsRepo) scope.get(Reflection.getOrCreateKotlinClass(SettingsRepo.class), (Qualifier) null, (Function0<? extends ParametersHolder>) null));
    }
继续寻找a的调用者,最后可得到其文件所在:
public static final File a(@NotNull String str) {
    Intrinsics.checkNotNullParameter(str, "");
    switch (C0267a.f27930a[OsArch_jvmKt.getHostOs().ordinal()]) {
        case 1:
            String property = System.getProperty("user.home");
            String lowerCase = str.toLowerCase(Locale.ROOT);
            Intrinsics.checkNotNullExpressionValue(lowerCase, "");
            return new File(property, "." + lowerCase);
        case 2:
            return new File(System.getProperty("user.home"), "AppData/Local/" + str);
        case 3:
            return new File(System.getProperty("user.home"), "Library/Application Support/" + str);
        default:
            String property2 = System.getProperty("user.home");
            String lowerCase2 = str.toLowerCase(Locale.ROOT);
            Intrinsics.checkNotNullExpressionValue(lowerCase2, "");
            return new File(property2, lowerCase2);
    }
}
由于寻找很久没找到iv的实现和存储,所以猜测iv是由第三方库进行封装。找到该库的AES.GCM示例代码debug后,发现其果然将iv绑定在密文的前12个字节,这也是默认GCM加密方式的推荐做法。
0x03 playload
import base64
import binascii
import os
from cryptography.hazmat.primitives.ciphers.aead import AESGCM

aes_key = "xxxxxxx...FcFDwxZAQcAUg5TAlRWVA=="
xor_str = "xxxxxxxxxxxxa26f1bde2a454ac78eba2164a20df6e70ed"


def decode_aes_key(aes_key: str, xor_str: str):
    aes_key = base64.b64decode(aes_key)
    xor_bytes = xor_str.encode("utf-8")
    return bytes(k ^ xor_bytes[i % len(xor_bytes)] for i, k in enumerate(aes_key))


def hex_to_byte_array(hex_string: bytes):
    return binascii.unhexlify(hex_string)


def byte_array_to_hex(barr: bytes):
    return binascii.hexlify(barr)


# Encryption function
def encrypt(data: bytes, key: bytes):
    aesgcm = AESGCM(key)
    nonce = os.urandom(12)  # GCM requires a 12-byte nonce
    print("Nonce:", nonce)
    ciphertext = aesgcm.encrypt(nonce, data, None)
    return nonce + ciphertext  # Prepend the nonce to the ciphertext


def decrypt(enc_data: str, key: bytes):
    print("decrypt_key:", key)
    aesgcm = AESGCM(key)
    cipher_text = hex_to_byte_array(enc_data)
    nonce = cipher_text[:12]
    print(f"decrypt_nonce: {nonce}, len: {len(nonce)}")
    cipher_text = cipher_text[12:]
    print(f"cipher_text: {cipher_text}, len: {len(cipher_text)}")
    return aesgcm.decrypt(nonce, cipher_text, None)


aes_key = decode_aes_key(aes_key, xor_str)
aes_key = hex_to_byte_array(aes_key)

# 2030年1月1日过期
text = "1893456000000"
print("text:", text)
cipher_text = encrypt(text.encode("utf-8"), aes_key)
print("cipther_text", cipher_text)
print("cipher to hex:", byte_array_to_hex(cipher_text))


# verify
cipher_text = (
    "074e545015a4b2829de6760e1ccff390d3cb08a8137028f39dacac60d0d2dcfxxxxxxxxxxxxxxxx"
)
print("decrypt: ", decrypt(cipher_text, aes_key))
Comments NOTHING